
Lunge Form, 5 Knee Checkpoints Before Your Next Rep
Most lunge knee pain comes from form, not the exercise. Five checkpoints most beginners skip — and the fix takes one warm-up set.
Lunge Form is where 90% of “bad knees at the gym” stories actually start. Not squats. Not deadlifts. Lunges — because the load lands on a single leg with almost no bracing help from the other side. The knee has to stabilize side-to-side, front-to-back, and rotationally, all at the same time, all under load. Any weakness in that chain shows up as pain in the joint, even when the joint itself is fine.
Ask ten people why their knees hurt after leg day and most will blame the exercise itself. “Lunges are just bad for knees,” they’ll say. But sports medicine research keeps saying the opposite: lunges are used in FIFA 11+ injury prevention programs, ACL rehabilitation protocols, and post-surgery return-to-sport programming worldwide. Physical therapists prescribe them. Olympic strength coaches build entire programs around split-stance variations. The exercise doesn’t wreck knees. Form does.
Here’s the frustrating part: bad Lunge Form doesn’t always feel bad in the moment. A knee caving inward one degree per rep is invisible to the lifter — they’re focused on standing up, not on the frontal-plane geometry of their femur. The damage accumulates over hundreds of reps across dozens of workouts, and by the time the joint starts protesting, most people assume they’ve simply “worn it out.”
The five checkpoints below cover almost every failure mode I’ve seen — knee angle, foot tracking, hip alignment, weight distribution, and torso lean. Get these right and the pain that felt structural usually turns out to be mechanical. Get them wrong and no amount of glucosamine or knee sleeves will save the joint from what your own body is doing to it.
Knee cave (valgus collapse)
Weak gluteus medius lets the front knee drift inward. This is the #1 cause of medial knee pain during lunges — the meniscus takes torque it wasn’t built for.
Vertical shin, short stride
Stepping too short forces the knee past the front toes and jams the load into the patellar tendon. Fix stride first, worry about depth second.
Hip rotation, twisted pelvis
If the pelvis turns instead of hinging, force travels sideways through the knee joint. Both hip points should stay square to the front wall.
Bolt-upright torso
A perfectly vertical spine shifts load off the glutes and onto the quads — and by extension, the front kneecap. A slight forward lean unloads the joint.
Bad lunges damage knees.
Good lunges rehab them.
Lunge Form: 5 Knee Checkpoints, One at a Time
The 90-Degree Front Knee (Shin Vertical)
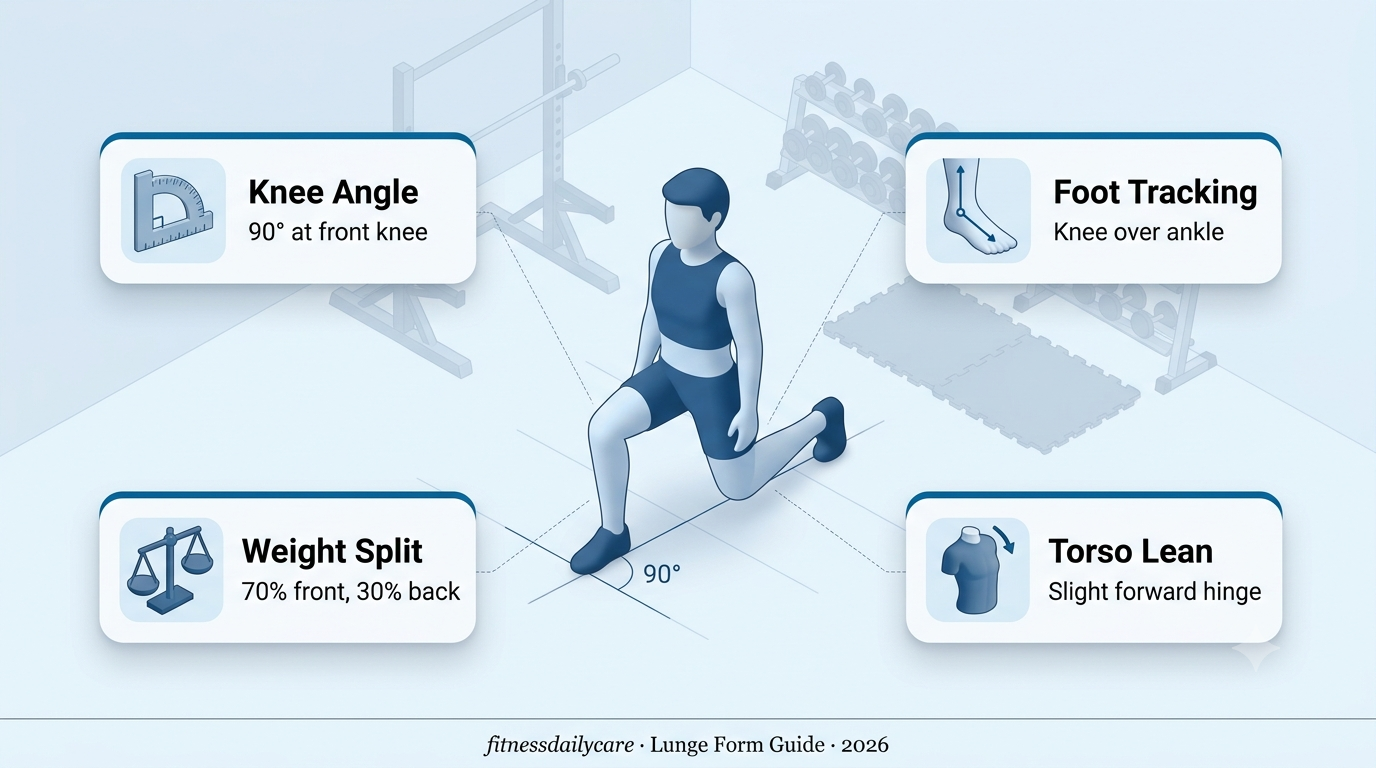
At the bottom of a proper lunge, the front thigh sits parallel to the floor and the shin points straight up. Viewed from the side, the front leg makes a clean “L” shape — knee stacked directly above the ankle, not sliding forward past the toes. Both angles at the front joint (hip and knee) sit at approximately 90 degrees. This is the neutral position where the load line runs cleanly through the leg’s structural architecture.
This one alignment does more for knee protection than any brace or wrap. When the shin stays vertical, the load line runs from the hip down through the ankle, and the kneecap sees compressive force instead of shear. Push the shin forward and the vector rotates: now the patellar tendon absorbs what should have been carried by the glute chain. Every degree the shin tilts forward past vertical multiplies the sheer force across the front of the knee, which is why chronic patellar tendinitis is the most common overuse injury in lifters who lunge with too-short strides.
The 90-degree rule cuts both ways, though. Going deeper than parallel — bending the knee past 90 degrees so the thigh drops below horizontal — doesn’t add strength gains for most people, but it does multiply joint compression significantly. Rehab specialists often recommend staying at or slightly above the parallel line, especially early in a program or when returning from injury.
Knee-Over-Ankle, Foot Pointed Straight
The classic Lunge Form failure is the front knee drifting inward during the descent — physical therapists call it dynamic valgus, and it’s the single strongest predictor of patellofemoral pain in one-legged movements. The knee should track directly over the second and third toes, forming a straight line from hip to ankle when viewed head-on. Any deviation from that line increases rotational torque on the meniscus and puts uneven pressure on the cartilage under the kneecap.
Foot position sets up everything above it. If the front toe points inward or outward, the knee has no choice but to follow, and the tibia rotates against the femur — a torque the meniscus was never designed to absorb rep after rep. The safest default is toes pointing straight ahead or angled outward by no more than 15 degrees. Point them inward and the knee will cave. Point them too far outward and the hip rotates externally, which twists the pelvis.
The root cause of most knee cave isn’t the knee itself — it’s a weak gluteus medius, the hip muscle that pulls the femur outward. When the gluteus medius fires late or weakly, the adductors on the inner thigh win the tug-of-war, and the knee drops inward. This is why hip-strengthening drills fix knee tracking problems far faster than any amount of “just push your knee out” cueing.
Hips Square to the Front Wall
Imagine your pelvis has two headlights (the bony points on the front of your hips, technically the ASIS). Both should shine straight forward through the entire rep. When one side rotates back — usually the back-leg side — the front knee gets a rotational force that stacks on top of the compressive load. Suddenly the joint is fighting a twisting motion it wasn’t designed to resist under load.
This is the alignment issue that separates a lunge from a step-back stretch. Athletes who compete in single-leg sports (soccer, tennis, basketball) train this specifically because pelvic control under load is what protects the ACL and MCL in real-world movements. When the pelvis loses its neutral position, the whole kinetic chain compensates — and the knee is where those compensations most often show up as pain.
Hip rotation during a lunge usually traces back to one of two causes: tight hip flexors on the back leg pulling the pelvis into an anterior tilt, or weak deep core muscles failing to lock the pelvis in position. Address either root cause and the rotation typically resolves without needing to consciously think about it during every rep.
Front Foot 70%, Back Foot 30%
A lunge is a single-leg exercise wearing a two-leg costume. The back foot is a kickstand — it stabilizes but shouldn’t carry meaningful load. When lifters unconsciously push through the back foot, weight distributes 50/50, the pelvis destabilizes, and the front knee ends up in the muddled middle. The exercise loses its purpose (single-leg strength) and gains all the injury risk of a poorly-balanced squat.
The cue that works: “Drive through the front heel.” On the way up, imagine pushing the floor away with the entire front foot — heel first, then mid-foot, then toes. The back leg just goes along for the ride. Some coaches even have their athletes practice with the back foot elevated on a bench (a Bulgarian split squat variation) precisely because it forces the correct weight distribution — the back leg physically can’t push through anymore.
Here’s the tell-tale sign that your weight split is wrong: soreness pattern the next morning. Correct Lunge Form leaves the front-leg glute and hamstring sore. Wrong Lunge Form (weight too far back, or too much quad drive) leaves the front-leg quad or the back-leg thigh sore instead. If your training log shows the wrong pattern week after week, no amount of adding weight will fix what the weight distribution is doing.
The Slight Forward Hinge (Not Upright)
Fitness culture keeps repeating “stay tall, chest up” as if any forward lean is a cardinal sin. Biomechanical research says the opposite for knee-friendly Lunge Form: a bolt-upright torso puts the barbell (or your bodyweight) far behind the knee joint, and the quads have to fight that leverage the whole way down. The result is what the Cornell/UMass/Cybex research team documented: significantly higher patellofemoral joint stress in upright-torso variations compared to slightly-forward-leaning variations of the same lunge.
A slight forward hinge — about 15 to 25 degrees, chest sliding over the front knee — shifts the load line back toward the hips. Now the glutes and hamstrings can share the work with the quads, and the front kneecap gets a break. This is the same principle that protects the back in a good morning versus a squat: the further the load line moves toward the working joint, the less that joint has to fight leverage.
The forward lean also produces the aesthetic effect most lifters actually want — a bigger, more sculpted glute — because it recruits the hip extensors more heavily. If your goal is quad development, an upright torso does emphasize the front thigh. But if the goal is glute development plus knee protection, the slight forward hinge wins on both counts.
⚠ Myth Check: “Your Knee Should Never Go Past Your Toes”
This is the most-repeated Lunge Form rule in gyms — and it’s not what the research actually says. A UC Davis Human Performance Lab review of the biomechanical literature concluded that bodyweight lunges, whether or not the front knee travels past the toes, do not generate forces high enough to damage healthy knee structures. The rule became gospel in the 1980s and 90s largely because it happened to correlate with better performance in early motion-capture studies — but correlation was mistaken for causation.
The rule exists as a rough safety guideline, not a hard line. Anatomical variation, ankle mobility, and hip mobility all shift where the “safe” knee position lands. People with longer femurs, for example, may need the knee to travel slightly past the toes just to reach a proper 90-degree bend, and forcing them into a vertical shin can actually create the shear force the rule was meant to prevent.
The reason your knee should stay near vertical isn’t that crossing the toes is destructive — it’s that the vertical shin position happens to be where the glutes are best positioned to take load off the quads. Cause versus correlation. Use the toe line as a general cue, not a law. If a small amount of knee-past-toe travel is what gets you into full depth with a strong hip hinge, that’s better Lunge Form than a truncated rep at a shorter stride.
Lunge Form Mistakes That Look Correct on Video
The “quiet” back knee
The back knee taps the floor softly, so it looks like a clean rep. But if the tap coincides with the pelvis tilting backward, you’re using the floor as a landmark instead of controlling depth. The knee should stop just above the floor, held by hip control — not stopped by ground contact.
Fast up, slow down
Most lifters spend 3-4 seconds on the descent (impressive!) and then rocket back up in half a second. The reason: they cheat the concentric by using stretch reflex and forward torso momentum. A 2-second concentric matched to a 2-second eccentric exposes weak points but builds cleaner strength.
The invisible heel lift
The front heel appears planted, but if you slid a piece of paper under it at the bottom, it would pull through easily. This is the ankle mobility check most people fail without knowing. It shifts load forward onto the knee. Try a lifted-heel test: consciously press the front heel into the floor as hard as the toes.
Back-leg quad bearing
The back quad handles more load than it should, hiding the truth about which leg is actually working. If your soreness pattern next day shows back-leg quad instead of front-leg glute, this is what’s happening. Elevate the back foot on a low platform to eliminate the cheat.
▎ 4-Minute Pre-Lunge Warm-Up Routine
- Lateral band walks · 2×10 each direction. Wakes up the gluteus medius so the front knee tracks straight instead of caving.
- Ankle rocks · 2×8 each leg. Kneeling half-lunge, rock the front knee forward and back to check ankle mobility before loading.
- Hip flexor stretch · 30 seconds each side. Tight hip flexors force the pelvis to tilt, wrecking hip alignment during the rep.
- Bodyweight split squat · 2×5 each leg. Practice the pattern under zero load. Every checkpoint above, one rep at a time.
- First working set at 50% weight. Never load the pattern cold. The first heavy set is where most valgus collapse happens.
The knee isn’t the problem.
It’s just the loudest witness.
Lunge Form Verdict · The 5-Checkpoint Cheat Sheet
Front knee at 90° — thigh parallel, shin vertical. If the heel lifts, your stride is too short.
Knee tracks over ankle — no inward caving. Blame the gluteus medius, not the knee.
Hips stay square — both hip points aimed at the front wall. Twist = torque = injury.
Weight 70/30, front foot heavy — drive through the front heel. Back leg is a kickstand.
Chest over the front knee — 15-25° forward hinge, not bolt-upright. Lets the glutes carry the load.